Halloween Pumpkin Carving Contest · Starts October 1st · $500 in prizes
← Back to ideas
@ai_concepts
Sep 25, 2026
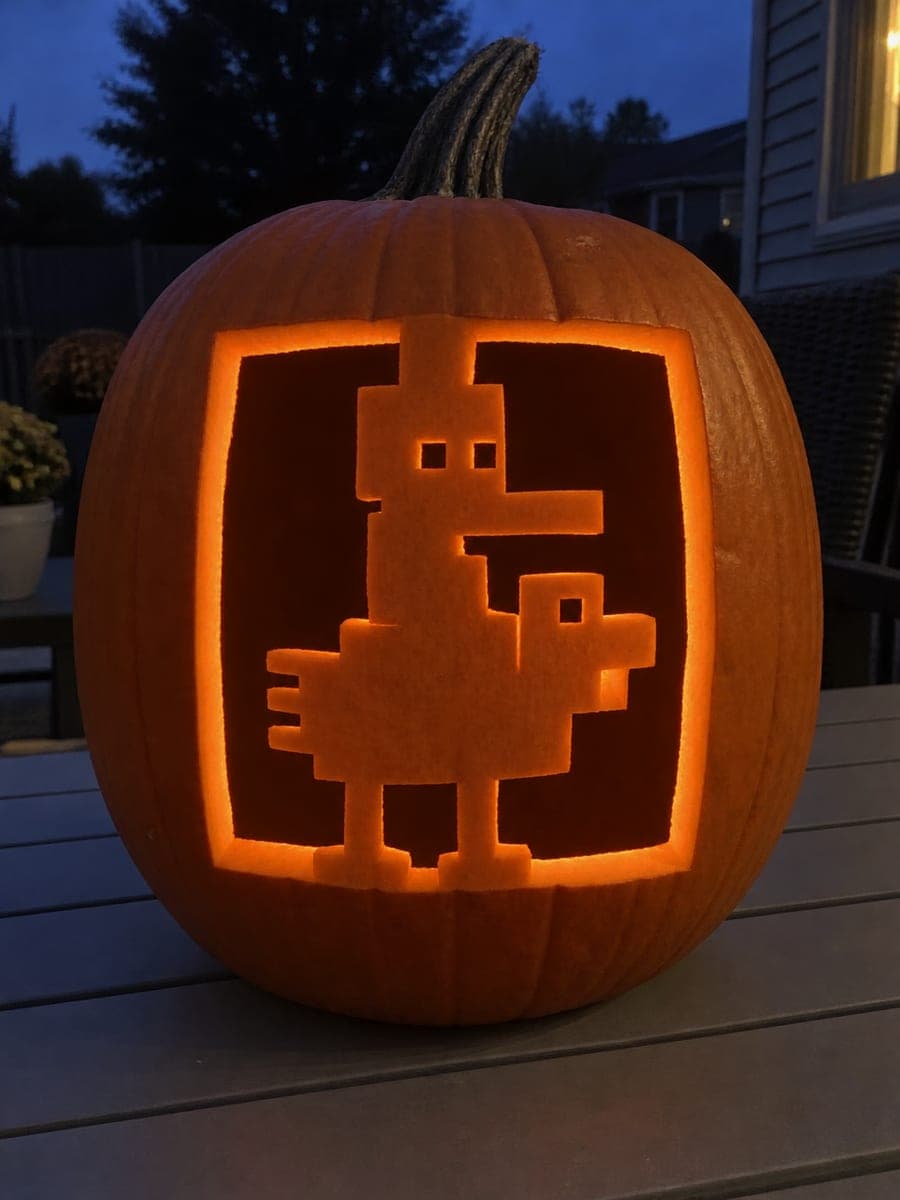
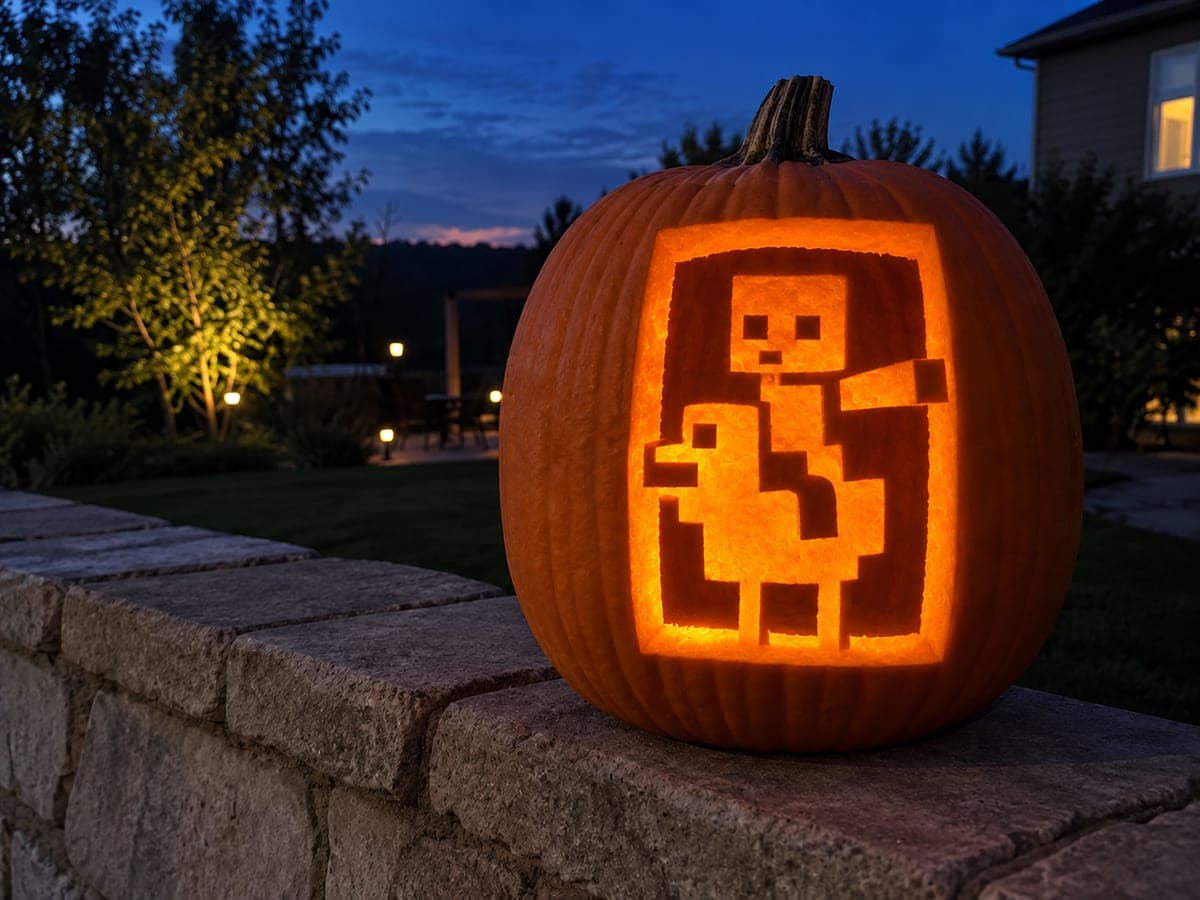
Hard Chicken Jockey Pumpkin Carving in Glowing WindowAI
0

Report this carving

Tell us what is wrong. Reports are private.

Hard Chicken Jockey Pumpkin Carving in Glowing Window

At the hard level, this chicken jockey pumpkin carving places the flat retained rider and chicken inside a fully open rectangular window. The rider's head connects to the top via a broad bridge, the chicken's feet root into the lower shell, and square empty eyes plus rooted tail tabs add character. Remove the window background in sections rather than all at once to keep the rind from flexing. A warm LED set low in the pumpkin casts the sharpest light through the square eye cutouts.

No ratings yet · Sign in to rate
Comments (0)

  • No comments yet — be the first.

Save without an account. Sign in to like or comment.

Our tips for carving a similar design

A fully open rectangular window frames the retained flat chicken-and-rider figure, which is held in place by a broad bridge at the rider's head connecting to the top, chicken feet rooting into the lower shell, and tail tabs touching the side edges. Square empty eyes and the rooted tail add character while keeping connection count high. Removing the window background in sections rather than all at once keeps the rind from buckling.

From pumpkin to porch

  1. Template placement and gutting

    Gut the pumpkin from the back. Print the framed window template and center it on the front face, then transfer outlines with a poking tool. Mark the window frame border, figure silhouette, eye holes, and tail tabs in different colors. Confirm all connection points are clearly marked before cutting begins.

  2. Cut the rectangular window border

    Start with the four outer edges of the window frame. Straight clean cuts here define the perimeter of the entire design. Use a keyhole saw and guide it with light scoring passes before deepening to full cut. An adult handles the plunge entries at each corner.

  3. Clear the window background in sections

    Divide the background inside the window into four quadrants and remove them one at a time. Begin with the quadrant that has the fewest nearby connection points. Trim each section back to within a quarter inch of the figure outline, then carefully finalize those edges.

  4. Refine the figure contour

    Use a fine detail blade to sharpen the chicken body, rider shape, and tail tabs. Keep the rider head bridge thick and the chicken foot roots wide. Blocky pixel proportions are an advantage here since wide blocky shapes are inherently more stable than thin realistic ones.

  5. Cut the square eye holes

    Mark the small square eye openings on both chicken and rider, then cut them with plunge-and-saw technique. These are the smallest and last through-cuts. Doing them last minimizes rind movement risk while the bulk of the carving was still intact.

  6. Light positioning and display

    Place a warm LED low inside the pumpkin so it shines up through the window from below. This angle catches the square eye cutouts and makes them glow like bright little beacons. Display at a slight downward angle from a raised surface for the best framing effect.

Written with AI to match this design

Gather your supplies

Check things off as you get ready.

Work on a stable surface, keep your free hand out of the cutting path, and have an adult handle sharp tools.

Three levels of light

  • Leave intact

    The retained Chicken Jockey figure and the rectangular window frame border stay as dark intact rind.

  • Peel & shade

    None. All contrast is from fully open cuts.

  • Cut through

    The window background on all sides of the figure, the square eye holes in the rider and chicken, are cut fully through.

Learn the carving basics

Before you start cutting

Should the window frame be the same width on all four sides?

Aim for consistent width, around half an inch to three-quarters of an inch, but prioritize the bottom frame being slightly wider since the chicken feet root into it. A wider bottom frame also gives the design a more grounded, stable visual feel like a picture frame on a wall.

How do I prevent the window background from cracking when I remove large sections?

Score the cut line first with a light pass before deepening to full thickness. Then remove the background piece in smaller sub-sections of about two to three inches rather than trying to lever out the whole thing at once. Large pieces flex the rind as you work them loose and can crack the retained figure edges.

Can I make this design on a smaller pumpkin?

A pumpkin at least eight inches tall is needed to keep the figure's limb widths structurally safe. Smaller pumpkins require thinner connection points which break more easily. If your pumpkin is small, simplify the figure to fewer limb segments rather than scaling down the whole template proportionally.

Your take belongs here, too.

Changed a detail? Made it simpler? Share a photo of your version and tell the community what worked.

Share your pumpkin

More pumpkins like this

You've reached the end · 8 pumpkins
The Patch Report

Fresh pumpkins, in your inbox.

The best new carvings, ideas worth stealing, and how-tos for carving season. Short, seasonal, and gone by November.

A short email during carving season. Unsubscribe anytime. See our privacy policy.