Halloween Pumpkin Carving Contest · Starts October 1st · $500 in prizes
← Back to ideas
@ai_concepts
Sep 25, 2026
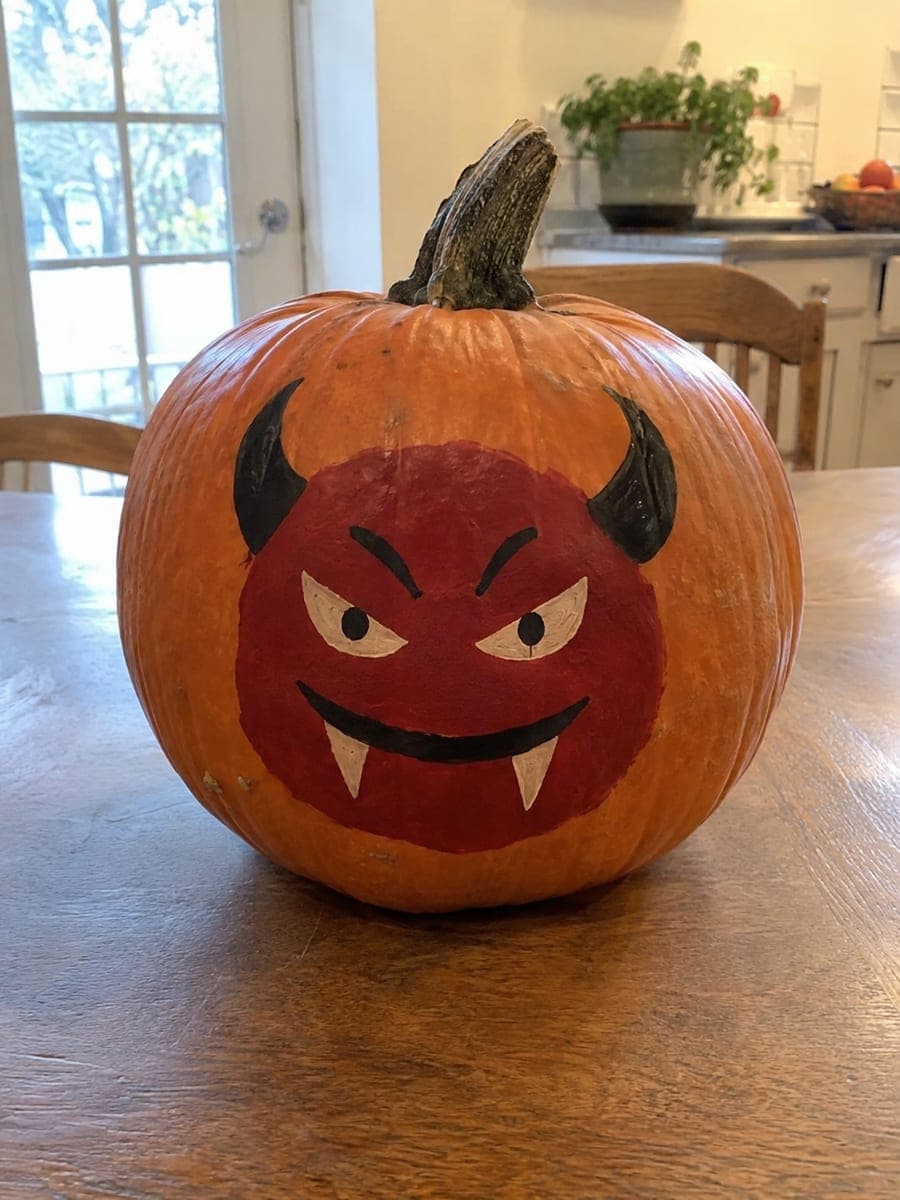
Painted Red Demon Pumpkin with Black Horns and FangsAI
0

Report this carving

Tell us what is wrong. Reports are private.

Painted Red Demon Pumpkin with Black Horns and Fangs

A red demon face with black horns and cream fang details painted on an intact pumpkin creates a bold demon pumpkin carving idea that requires no tools beyond brushes and craft acrylic. Apply the red face base first and allow it to cure fully before painting the black horn shapes extending upward from the forehead. Add cream fangs over the dry red lower face using a fine liner brush for sharp points. The high-contrast color scheme of red, black, and cream reads vividly in daylight and under porch lights at night.

No ratings yet · Sign in to rate

Comments (0)

  • No comments yet — be the first.

Save without an account. Sign in to like or comment.

Our tips for carving a similar design

This painting project builds the design in three clear color layers: the red face base, the black horn shapes extending upward from the forehead, and the cream fang details painted last over the dry red surface. Each layer fully cures before the next is applied, keeping colors clean and sharp. The high-contrast red-black-cream combination reads vividly both in daylight and under porch light at night, without any cutting tools involved.

From pumpkin to porch

  1. Clean and dry the pumpkin

    Wipe the pumpkin with a damp cloth and allow it to dry completely. A clean, dry surface bonds with acrylic paint far better than a waxy or damp one. If the rind has a waxy sheen, wipe lightly with rubbing alcohol on a cloth and let it dry before sketching.

  2. Sketch the face and horn layout

    Draw the overall demon face area and the two horn triangle positions in light pencil. Mark the eye positions, the mouth line, and the fang tips below it. A quick sketch ensures the horns and face features stay centered and proportional before any paint is applied.

  3. Apply the red face base in two coats

    Use a medium flat brush to paint the red demon face area in two thin, even coats, allowing the first coat to fully cure before the second. A thorough two-coat base hides the orange rind and gives subsequent colors their true value without bleed-through.

  4. Paint the black horn shapes

    Once the red base is fully dry, paint two black horn shapes extending upward from the forehead using a medium round brush. Allow the black to dry completely before moving to the fang step. Overlapping the black horn base slightly onto the red face creates a seamless join.

  5. Add the cream fang details

    Load a fine liner brush with off-white or cream acrylic and paint two pointed fangs hanging from the upper mouth area. Use a smooth, tapered pull-stroke for each fang tip: start wide at the top and lift the brush at the tip for a natural point. Let the cream dry before adding any eye details.

  6. Finish the eyes, seal, and display

    Paint eye shapes in a contrasting color, such as yellow or white, with dark pupils added once the base eye color dries. When all elements are fully dry, apply a coat of matte acrylic sealer. Display outdoors or on a porch; the high-contrast design reads clearly in any lighting.

Written with AI to match this design

Gather your supplies

Check things off as you get ready.

Work on a stable surface, keep your free hand out of the cutting path, and have an adult handle sharp tools.

Three levels of light

  • Leave intact

    The orange rind outside the red face area stays visible as the natural pumpkin background.

  • Peel & shade

    None; the shell stays fully intact.

  • Cut through

    None; display near a porch light or spotlight to illuminate the painted design from outside.

Learn the carving basics

Before you start cutting

How do I get the cream fangs to look sharp and pointed rather than blunt?

A fine liner brush with a pointed tip is essential. Load the brush with a small amount of paint and start each fang stroke at the wide base, pulling smoothly toward the tip while lifting the brush off the surface in one fluid motion. Practice the stroke on paper before applying it to the pumpkin.

Can I use fabric or nail art brushes instead of craft brushes?

Nail art liner brushes work very well for fang and eye detail work on pumpkins since they are designed for precise fine lines. A basic nail art set usually includes a long liner brush that is ideal for the fang taper stroke. Just clean brushes with water immediately after use.

What if the black horn paint bleeds into the wet red base?

Allow the red base to cure fully, which means dry to the touch plus an additional ten to fifteen minutes, before applying the black. If bleeding does occur, let everything dry completely and then repaint the affected area with a thin correcting coat of red before re-adding the black horn edge.

Your take belongs here, too.

Changed a detail? Made it simpler? Share a photo of your version and tell the community what worked.

Share your pumpkin

More pumpkins like this

You've reached the end · 8 pumpkins
The Patch Report

Fresh pumpkins, in your inbox.

The best new carvings, ideas worth stealing, and how-tos for carving season. Short, seasonal, and gone by November.

A short email during carving season. Unsubscribe anytime. See our privacy policy.