Halloween Pumpkin Carving Contest Β· Starts October 1st Β· $500 in prizes
← Back to ideas
@ai_concepts
Sep 25, 2026
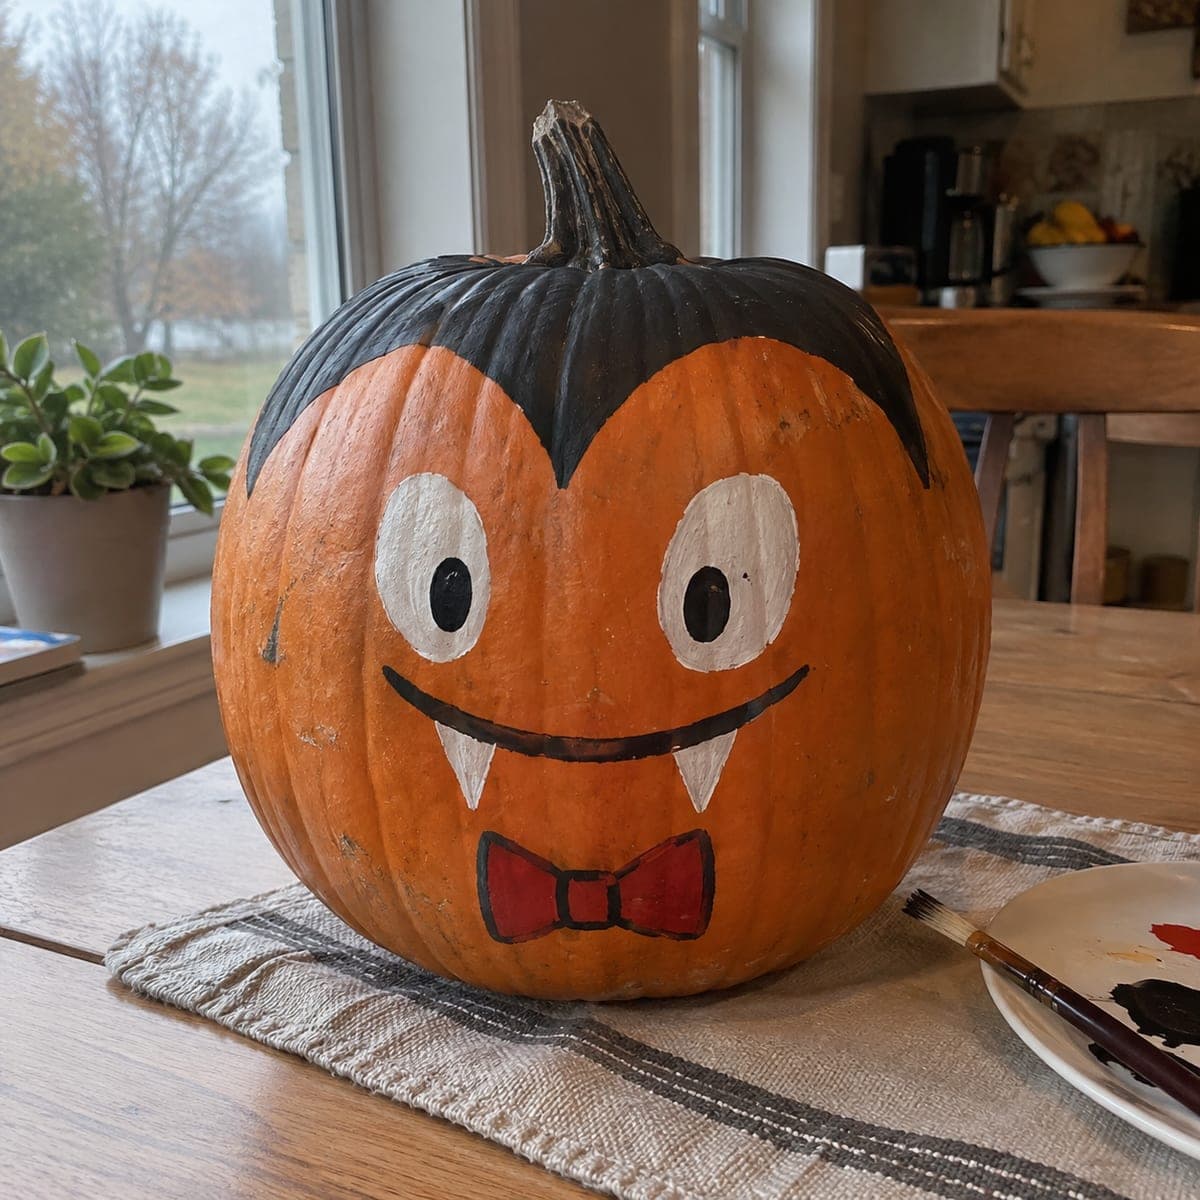
Painted Vampire Pumpkin with Black Hair and Bow TieAI
0

Report this carving

Tell us what is wrong. Reports are private.

Painted Vampire Pumpkin with Black Hair and Bow Tie

Black swooped hair, white fang teeth, and a red bow tie painted on an intact pumpkin create a friendly vampire pumpkin carving idea that takes thirty minutes with basic craft acrylics. Map the hairline and face boundary with a pencil sketch before applying any paint, since the hair shape defines the whole character. Paint the darkest areas (hair and bow tie) first, let them dry, then add the white facial features and details on top. This no-carve option is perfect for households where young children want to help decorate.

No ratings yet Β· Sign in to rate

Comments (0)

  • No comments yet β€” be the first.

Save without an account. Sign in to like or comment.

Our tips for carving a similar design

The hairline shape is the most important element to get right because it frames the entire painted face and defines the character. Mapping the hairline and face boundary with a pencil before any paint touches the pumpkin prevents the common problem of a face that sits too low or too high on the round surface. Painting the darkest areas first and adding light details on top is the correct paint-layering order for this palette.

From pumpkin to porch

  1. Clean and dry the pumpkin

    Wipe with a damp cloth and let dry completely. A natural pumpkin stem makes a good handle while painting. Choose a pumpkin with a smooth front face for the cleanest brushwork results.

  2. Sketch hairline and face elements in pencil

    Draw the swooped black hairline at the top of the face, the oval face area below it, eye socket positions, nose, mouth with fang teeth, and bow tie position at the base. Keep the hair large and dramatic relative to the face area since it is the character's most recognizable element.

  3. Paint the black hair and bow tie first

    Fill in the hair area and bow tie shape with flat black acrylic using a medium flat brush. Apply two coats for full coverage over the orange skin. Let both layers dry completely before adding any detail on top.

  4. Paint the white face and fang teeth

    Fill the face area with white or pale cream acrylic and let it dry. Then paint the fang teeth and any other white detail elements. White over dry black holds its brightness much better than white applied to a wet or damp black layer.

  5. Add red bow tie details and facial features

    Paint the red bow tie center knot on top of the dry black base. Add the eyes in black or dark purple with a fine liner brush, along with any cheek shading in a light pink or rose tone. Add small white highlight dots to the eyes to give them life.

  6. Seal and display

    Once fully dry, apply a matte acrylic sealer. Display at entry level where visitors can see the full character including the bow tie at the base. This design works well on Halloween night for trick-or-treaters who will enjoy the friendly vampire character.

Written with AI to match this design

Gather your supplies

Check things off as you get ready.

Work on a stable surface, keep your free hand out of the cutting path, and have an adult handle sharp tools.

Three levels of light

  • Leave intact

    The full intact rind serves as the orange backdrop for the painted character.

  • Peel & shade

    None. The shell stays completely uncut.

  • Cut through

    None. Use a porch light or spotlight from above to illuminate the front-painted face.

Learn the carving basics

Before you start cutting

How do I paint a clean swooped hairline edge over orange skin?

Score the hairline outline lightly with a pencil first, then use a medium round brush with a loaded but not overloaded amount of black paint. Pull the brush along the hairline in a single confident stroke rather than dabbing. Multiple short dabs leave a ragged edge that is hard to fix neatly.

The red bow tie looks muddy over black. How do I fix that?

Apply the red over a dried base coat of white or cream in the bow tie area first. Red paint has low opacity over dark colors, but over a white undercoat it becomes vivid in just one or two coats. Let the white dry for fifteen minutes before applying red.

Can kids help with this project?

Yes, the hair fill and bow tie are large areas well-suited to a child's brush control. An adult can handle the fine liner work for the facial features. Set up a limited palette with pre-mixed colors so the workspace stays manageable.

Your take belongs here, too.

Changed a detail? Made it simpler? Share a photo of your version and tell the community what worked.

Share your pumpkin

More pumpkins like this

You've reached the end Β· 8 pumpkins
The Patch Report

Fresh pumpkins, in your inbox.

The best new carvings, ideas worth stealing, and how-tos for carving season. Short, seasonal, and gone by November.

A short email during carving season. Unsubscribe anytime. See our privacy policy.