Halloween Pumpkin Carving Contest · Starts October 1st · $500 in prizes
← Back to ideas
@ai_concepts
Sep 14, 2026
Scaled Reptile Eye PumpkinAI
0

Scaled Reptile Eye Pumpkin

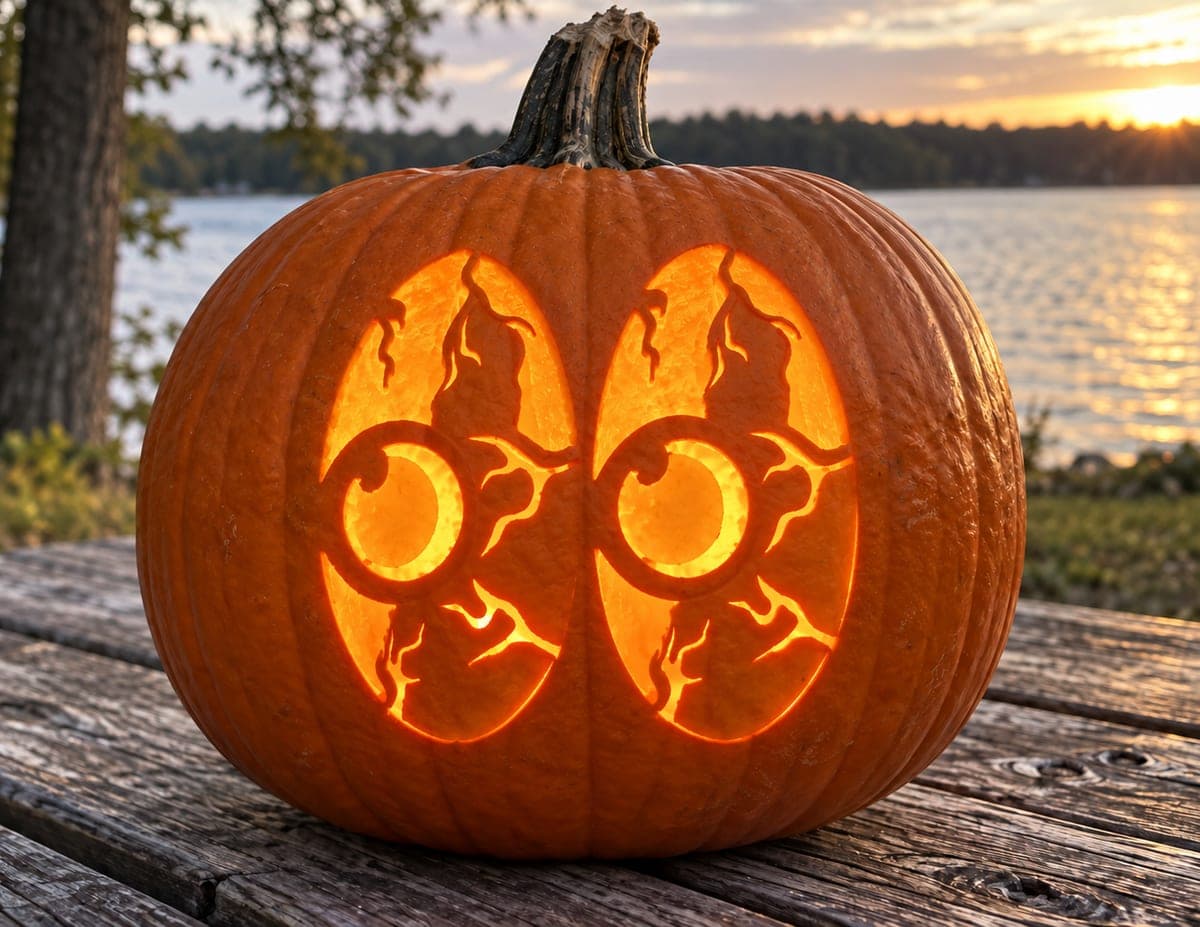
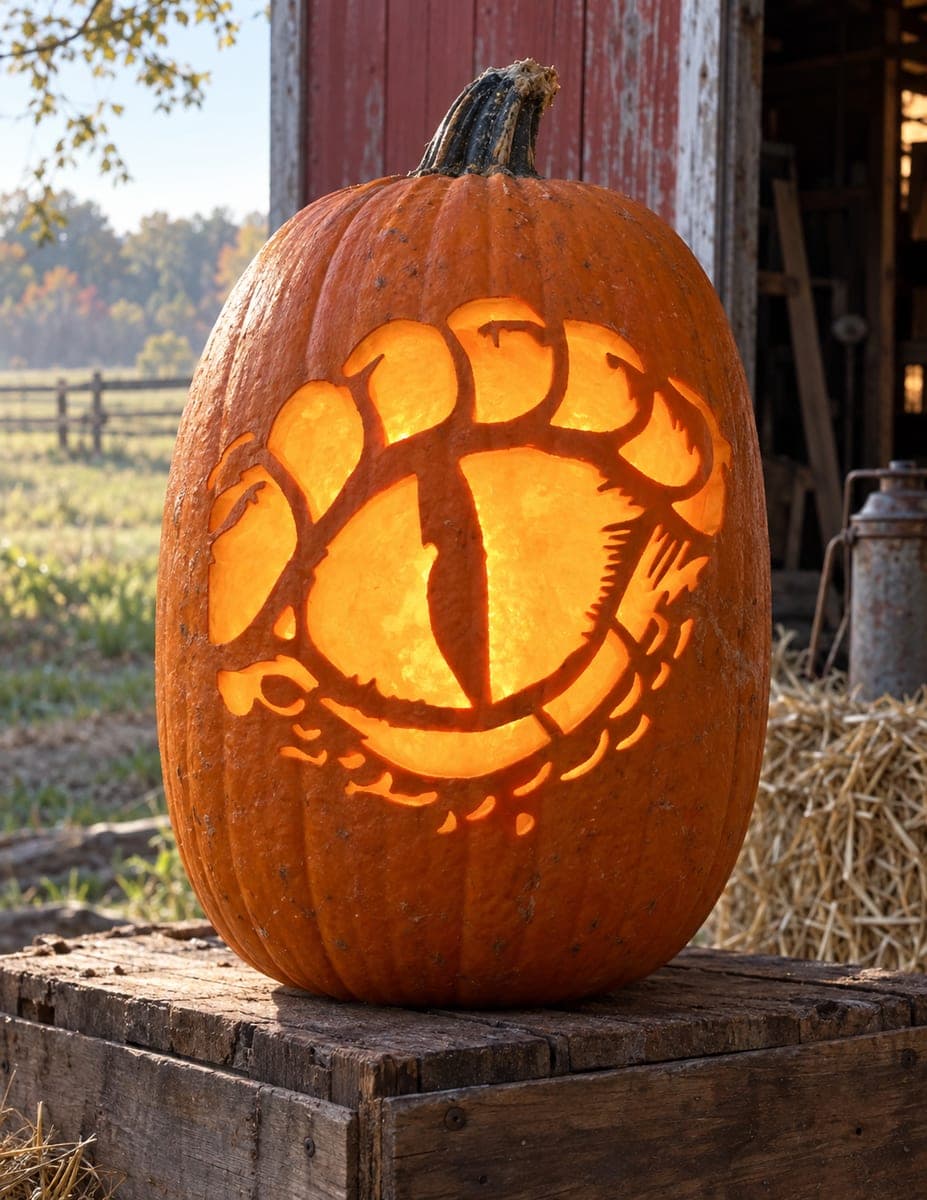
A large reptilian eye with a vertical slit pupil sits at the center of the pumpkin, ringed by jagged scale shapes, claw-like projections, and smaller organic details that all remain as dark uncut rind against a glowing background. The dark iris ring surrounding the slit pupil is one of the narrowest bridges in this silhouette pumpkin carving idea, so it should be the last section removed. Work the outer scale projections first, then close in toward the pupil ring so the most delicate part of the design stays braced until the end.

This is an AI-generated concept image: a realistic, carvable design idea rather than a photo of a finished carve. AI concepts are always labeled and sit out the leaderboard and the contest.

No ratings yet · Sign in to rate

Comments (0)

  • No comments yet — be the first.

Save without an account. Sign in to like or comment.

Our tips for carving a similar design

The core trick here is a silhouette carving, where everything that reads as detail stays as dark uncut rind and the whole background is opened up to glow. The slit pupil, the iris ring, the jagged scales, and the claw-like points are all held together by thin bands of skin, so the plan is to open the outer background first and save the narrow iris ring for last. Work from the edges inward so the most fragile bridges stay braced as long as possible.

Written by PumpkinCarvingIdeas.com, inspired by the image above. These are our suggestions, not instructions from the uploader. This approach to the AI concept has not been tested on a real pumpkin.

From pumpkin to porch

  1. Transfer the pattern and plan your bridges

    Print or draw the reptile eye at a size that fits the flat front of your pumpkin, then tape it firmly in place. Poke through the lines with a pin or a transfer wheel so you can see the outline once the paper comes off. Before you cut, mark which shapes stay dark, the pupil, the iris ring, the scales, and the claws, and which areas become open light. Note the narrow iris ring around the slit and remind yourself to leave it until the very end.

  2. Open the lid and clean the wall

    Have an adult cut a lid on the back or bottom rather than the top so the front stays smooth. Scoop out the seeds and pulp, then scrape the inside wall behind the design down to about one inch thick. A thinner wall makes the fine background cuts easier and lets more light through. A flat, even wall helps your blade travel cleanly through the tight curves.

  3. Cut the outer background first

    Start with the large open areas around the outer scale projections and claw points, the places farthest from the pupil. Use a small saw or a craft knife and take short, controlled strokes, letting the blade do the work. Cutting these big openings first removes stress from the pumpkin while the delicate center is still fully supported. Push the cut pieces out gently from the inside so you do not snap nearby bridges.

  4. Work inward toward the scales

    Move steadily from the outer edges toward the center, opening the background between each jagged scale shape. Keep the dark rind shapes intact and clean up their edges as you go. Rotate the pumpkin instead of twisting your wrist so your cuts stay smooth on the curves. Leave the ring of skin directly around the pupil untouched for now.

  5. Remove the iris ring last

    The narrow band around the slit pupil is the most fragile part, so save it for the final cut. Carefully open the background on both sides of the vertical pupil, leaving that thin dark ring floating against the light. Support the ring with a fingertip from behind as you finish each stroke. If a spot feels weak, leave a tiny extra bridge of skin rather than risk a break.

  6. Light it and photograph

    Drop in a battery LED light or two so the whole background glows warm orange and the eye reads dark against it. Skip real candles, since the thin walls and fine cuts can scorch and the shapes are too delicate for open flame. Set the pumpkin somewhere dim, like a porch step or a hay bale, and shoot in low light to catch the slit pupil. A dab of petroleum jelly on the cut edges helps slow drying if you want it to last.

Gather your supplies

Check things off as you get ready.

Work on a stable surface, keep your free hand out of the cutting path, and have an adult handle sharp tools.

Three levels of light

  • Leave intact

    The slit pupil, the iris ring, the jagged scales, and the claw-like points all stay as dark uncut rind.

  • Peel & shade

    Optional: lightly skin-peel a faint halo just outside the outer scales for a soft dim glow that frames the eye.

  • Cut through

    The entire background between and around the eye shapes is cut through for the brightest orange light.

Learn the carving basics

Before you start cutting

Why should I cut the iris ring around the pupil last?

That thin band of dark skin around the slit is the narrowest bridge in the whole design, so it breaks easily if the pumpkin flexes. By opening all the outer background first, you keep the pumpkin rigid and the center braced while you work. Cutting it last means the fragile ring spends the least possible time unsupported.

What size pumpkin works best for this design?

Pick a tall, wide oval pumpkin with a smooth, fairly flat front so the eye has room to spread out. A larger surface gives you more space between the fine cuts, which makes the thin scale bridges stronger. Bigger pumpkins also give your hands and blade more room to move through the tight curves.

This is a lot of detail. How do I keep the scales from breaking?

Keep your interior wall thin and even, around one inch, so your blade glides instead of forcing the rind. Work from the outer edges inward and support each shape from behind with a finger as you finish a cut. If any bridge feels weak, leave a little extra skin rather than chase a perfectly thin line.

Your take belongs here, too.

Changed a detail? Made it simpler? Share a photo of your version and tell the community what worked.

Share your pumpkin

More pumpkins like this

You've reached the end · 8 pumpkins
The Patch Report

Fresh pumpkins, in your inbox.

The best new carvings, ideas worth stealing, and how-tos for carving season. Short, seasonal, and gone by November.

A short email during carving season. Unsubscribe anytime. See our privacy policy.